The Geonosian Territory Battles were launched in June 2019 starting with with the Dark Side battles, officially named Geonosis: Separatist Might and then followed by Geonosis: Republic Offensive on the Light Side in December 2019. Now into 2021, this game mode continues to be a challenge for endgame and casual players alike and Gaming-fans.com is pleased to continue to seek to help SWGoH players across the globe in their quest to get the most out of their roster.
The Geonosis: Republic Offensive Territory Battle features four Phases which last 36 hours each. Each of the four Phases of the event has a Special Mission rewarding Mk II Guild Event Tokens in Phases 1, 2 and 4 and Ki-Adi-Mundi shards in Phase 3.
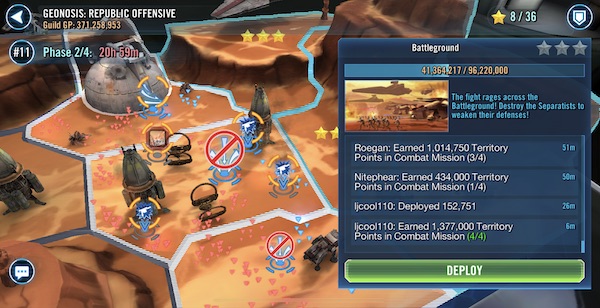
The following is a Walkthrough of my experiences in Phase 2 that will be updated over time. Phase 2 has five Combat Missions and a Special Mission, with three of the Combat Missions requiring 7-star, 21,000+ power Jedi, Galactic Republic or GAS & Ahsoka. Below is what I used on this specific mission.
Phase 2 (Middle) Galactic Republic Combat Mission Requirements:
- Minimum 7-star characters, 21,000+ Power
- Galactic Republic
My Roster of Galactic Republic Heroes:
- Shaak Ti – 32,377 power – 7-stars – Gear 13, Relic 7 – Six 6-dot mods (Speed & Health sets) – all abilities maxed, 332 speed, 93k health
- Rex – 30,181 power – 7-stars – Gear 13, Relic 7 – Six 6-dot mods (Speed & Health sets) – all abilities maxed, 309 speed, 66k health
- Echo – 29,347 power – 7-stars – Gear 13, Relic 7 – Six 6-dot mods (CD & CC sets) – all abilities maxed, 261 speed, 9,550 special damage
- ARC Trooper – 28,518 power – Gear 13, Relic 7 – Six 6-dot mods (Offense & CC sets) – all abilities maxed, 289 speed, 10,548 physical damage
- Fives – 32,328 power – 7-stars – Gear 13, Relic 7 – Six 6-dot mods (3 Health sets) – all abilities maxed, 221 speed, 116k health
Phase 2 (Middle) Galactic Republic Combat Mission Battle Notes:
01.13.21 – I start with Rex up first as I face a Sniper Droid, B2, B1, BX-series Commando Droid and a T-Series Tactical Droid. I focus first on the B2 and remove him quickly then focus on the Sniper Droid, using Shaak Ti’s call of all Clones to keep the Sniper Droid in check. While I almost lose Rex in the battle, I am able to have Shaak heal him and slip through, taking out the BX-series Commando Droid next, then the B1 last to finish this wave of enemies.
The second wave of enemies includes 3 B1 Battle Droids, a B1 Heavy Gunner and 2 BX-series Commando Droids. I am able to take out one of the BX-series Commando Droid before it takes a turn thanks to a AoE stun from Echo and the Rex-hilate attack, but the B1s catch up to me and kill off one of my Clones with their AoE attacks, causing the Fives sacrifice. I am able to get out of this wave by finishing the other BX-series Commando Droid and then taking out the B1s, but I am definitely wounded heading into the third wave.
The third wave has me facing a B2, MagnaGuard, Wat Tambor, Asajj Ventress and a T-Series Tactical Droid. After killing the B2, I focus on Asajj before Wat places the Tank Tech on the MagnaGuard to complicate that part. Luckily I have a Rex-hilate saved up and that does most of the work and I then transition to Asajj again. After Asajj is down the T-Series and Wat are done and I move on.
The final wave is Nute Gunray with 2 BX-series Commando Droids, a Droideka and a MagnaGuard. I start to focus on the Droideka as the Echo AoE stun is used perfectly to get this battle going. Next the AT-TE is at full strength and rains down upon the enemies as this battle heads in the right direction. I am able to kill off the Droideka, stun the droids with Echo again, and then Rex-hilate a BX-series Commando Droid before moving on to the other BX. After he is down I hit Nute until I cannot, then kill Magna before finishing off Nute for the win.