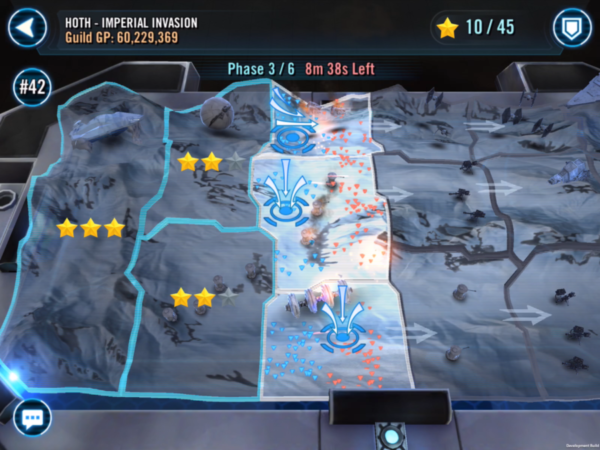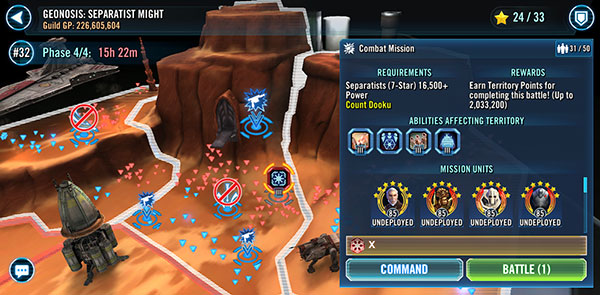
The Geonosis: Separatist Might Territory Battle in SWGoH features four Phases which last 36 hours each. Phase 4 features 3 territories as players battle with ships and ground troops. In the South Territory in Phase 4 there is a Special Mission where players can use their 7-star Wat Tambor to earn 40 Mk II Guild Event Tokens. To fight in the Phase 4 Special Mission you must have a 7-star Wat Tambor and a team of Separatists.
The following is a Walkthrough of my experiences in the Phase 4 Special Mission that may be updated over time.
Phase 4 Special Mission Requirements:
- 7-star Separatists, 16,500+ Power
- Wat Tambor required
My Roster of Separatists:
Here is a look at my roster of Separatists used for this Special Mission:
- General Grievous – 32,328 power – 7-stars – Gear 13, Relic 7 – Six 6-dot mods (3 Health sets) – all abilities maxed, 218 speed
- B1 Battle Droid – 25,707 power – 7-stars – Gear 13, Relic 5 – One 6-dot mod & 5 gold, 5-dot mods (Speed & Health sets) – all abilities maxed, 278 speed
- B2 Super Battle Droid – 25,752 power – 7-stars – Gear 13, Relic 5 – Two 6-dot mods, 4 gold, 5-dot mods (Health, Potency & Tenacity sets) – all abilities maxed, 152 speed
- Droideka – 20,943 power – Gear 12 +5 – 7-stars – One 6-dot mod & 5 gold, 5-dot mods (Offense & Health sets) – all abilities maxed, 121 speed
- Wat Tambor – 20,058 power – 7 stars – Gear 12 +1 – 6 gold, 5-dot mods (Speed & Health sets) – all abilities maxed, 263 speed
Phase 4 Special Mission Battle Notes:
02.06.20 – I start off with General Grievous, B2, B1, Droideka and Wat Tambor. Wat places the BlasTech Weapons Mod on the B1 Battle Droid and then he takes a few hits early, but I am able to get the train moving. Wat places the Baktoid Shield Generator on the summoned B2 Rocket Trooper and later the Chiewab Medpac on GG and I am able to push through the first of the four battles with relative ease.
The second wave of enemies are a bit more challenging as the B2 Rocket Trooper gets marked and takes some hits, but I offset this with the B1 Battle Droid’s special to recover Protection basically each time he attacks. The third battle is much like the second as the enemies get several attacks in on me, but the Rocket Trooper never dips below 100% health. After finally taking out the Clone Sergeant I then move on to Echo and down the line to advance.
The fourth and final battle is where it gets interesting. I start to focus on Ponds and a few moves into this one I lose Wat Tambor. I knew he was a bit squishy, but this has me sweating a bit, especially after B2 goes down shortly after. I am able to kill off Ponds and then switch focus to the Jedi Vanguard to remove all non-Elite or non-Entrenched enemies, but this one is worrying me. After removing the JV I switch focus to the Clone Sergeant and it seems that I have the train back on the tracks. Next I take out Luminara, their healer, and now it is time to kill off the offense – the Clone ARC Trooper first, then the Clone Commander. I continue to replenish the Protection for the B2 Rocket Trooper and land a Target Lock on the CC, so I switch focus to him and take both out to earn the 40 Mk II Guild Event Tokens for my guild.
My (Updated) Roster of Separatists:
Here is a look at my roster of Separatists used for this Special Mission:
- Geonosian Brood Alpha – 27,648 power – 7-stars – Gear 13, Relic 3 – Six 6-dot mods (3 Health sets) – all abilities maxed, 240 speed, 108k health
- Geonosian Spy – 25,270 power – 7-stars – Gear 13, Relic 6 – Six 6-dot mods (CC & CD sets) – all abilities maxed, 276 speed, 232.5% CD, 89.63% CC, 7,386 physical damage
- Poggle The Lesser – 20,875 power – 7-stars – Gear 13, Relic 2 – Six 6-dot mods (3 Health sets) – all abilities maxed, 280 speed, 69k health, 100.43% potency
- Sun Fac – 23,769 power – Gear 13, Relic 5 – 7-stars – Six 6-dot mods (3 Health sets) – all abilities maxed, 221 speed, 98k health, 94k protection, 64.3% armor
- Wat Tambor – 29,257 power – 7 stars – Gear 13, Relic 7 – 6 gold, 5-dot mods (Speed & Health sets) – all abilities maxed, 314 speed, 98k health
Phase 4 Special Mission Battle Notes:
05.02.21 – I start off by placing the tank tech from Wat onto the Geonosian Brute that is summoned by GBA, then the attack that each to Geonosian Spy. From here is is do what Gets do – get their mass-attacks in and try to land as many ability blocks on the offensive enemies as possible when I know I cannot kill that one before their next turn. I use basics with Geos as much as possible as GBA’s leadership sees Geos recover 3% Protection when they use a basic ability. I also try to time Geo Spy’s big hit for lots of buffs/debuffs to get kills over heavy hits. In addition, the argument can be made for Geonosian Soldier over Sun Fac in this lineup to help land more debuffs. I have a much stronger Sun Fac and thus I chose to use him.
The 3rd and 4th waves of enemies prove to be the real challenge as I lose the Geo Brute multiple times. The key here is keeping GBA’s 3rd ability available so that when he gets a turn he can re-summon the Geo Brute, then having Wat Tambor save the tank tech to place on him again. Remember, if Sun Fac dies you are down a character the rest of the battle, but if the Brute dies you can always bring him back. Also helpful is the use of Wat’s basic to clear debuffs and I primarily used this on GBA or Geo Spy, unless another character was stunned.
In the end I got the win with a full team still alive, but there were a few moments of concern. If your team is significantly weaker than this one it would be wise to use them on a Combat Mission instead so that you can maximize your Territory Points for your guild.