The second Phase of the newest Territory Battles is here as the Rise of the Empire Territory Battle continues. Unlike previous Territory Battles in SWGoH, the Rise of the Empire TB features Light Side, Dark Side and Neutral paths and Platoons are now called Operations. These Operations are even more critical than before, now requiring characters to be at certain Relic levels to even be included.
The Rise of the Empire Territory Battle features six Phases which last 24 hours each. Most of the six Phases of the event has a Special Mission rewarding Mk III Guild Event Tokens in Phases 1, 4, 5 and 6 and Reva (Third Sister) shards in Phase 3.
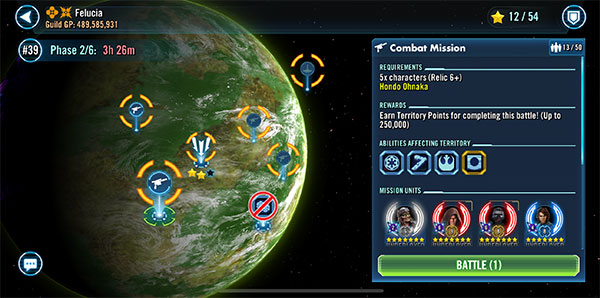
The following is a Walkthrough of my experiences in Phase 2 that will be updated over time. Specifically, this covers the Combat Mission on the Neutral map that requires Hondo Ohnaka at Relic 6 or higher.
For more specific content including guides and walkthroughs for the Rise of the Empire Territory Battle, stay here at Gaming-fans.com
Phase 2 Combat Mission Requirements:
- Hondo Ohnaka – Relic 6+
My Roster of Characters:
- Total Power – 154k
- Dash Rendar – Relic 7 –
- Han Solo – Relic 8 –
- Chewbacca – Relic 7 –
- Hondo Ohnaka – Relic 6 –
- L3-37 – Relic 7 –
Phase 2 Combat Mission Battle Notes:
12.27.22 – Picking the best team for Hondo Ohnaka is not as clear as I hoped, but I also did not love the CLS team in previous attempts in this Territory Battle, not do I need them with multiple Jedi teams, Rey, etc. So here we go with a Smuggler/Scoundrel team around Hondo. Note I have normal mods on the entire team other than Hondo who has borrowed Jedi Master Kenobi’s mods for this battle alone.
The battle is against Imperial forces with an Imperial Officer and four Troopers, but no stacks to worry about. Han stuns the officer but the enemies come out firing, weakening L3 badly. She self heals but it is not enough and I lose L3-37 before I kills a single enemy. When I do kill one of the Troopers, the enemy firepower continues to plague me killing Dash, and at this point the wheels fall off. I lose Han and Chewie on consecutive turns leaving just Hondo, who somehow survives for 60+ seconds on auto as his Ransom stacks to 50. I keep him hitting the Stormtrooper in an effort to make some progress and while I take over the attacks I find I, too, am making no progress as there is not enough offensive firepower on the board. Eventually I put it back on auto and the enemies finally kill Hondo and I have nothing to show for this battle or for my guild.
Next time my plan is to test out Bounty Hunters with Hondo to see if that unused group will fare better.
My Roster of Characters:
- Total Power – 167k
- Bossk – Relic 9
- Hondo Ohnaka – Relic 7
- Boba Fett – Relic 8
- Jango Fett – Relic 7
- Fennec Shand – Relic 7
Take 2 – Phase 2 Combat Mission Battle Notes:
01.10.23 – I double check and ensure that nobody used is needed elsewhere, as Fennec Shand has her own Combat Mission in Phase 3, and I proceed with a new lineup and a slightly stronger Hondo.
Before I take a turn Boba Fett’s resolve has been tested and he is in yellow health, so I get Bossk to taunt, Boba to dispel the Stormtrooper and then Bossk’s attack on the Recon Stormtrooper gets several hits on my target as I work toward the Bounty Hunter contract payout. As I am still learning how to use Hondo, I hold the Imperial Officer captive and have already reached payout for the Bounty Hunters. Now the challenge is working through these super-thick troopers as they keep whittling my Bossk down. I get Hondo to 11 stacks of Ransom and he calls Fennec which hits hard, then Jango kills the Recon Stormtrooper. I take some hard hits and Bossk taunts again, as I try to slowly make progress on the Range Trooper. He stomps, Stormtrooper taunts and this is gonna take forever… Finally the enemies kill Bossk and I am in trouble. I lose Fennec after trying to avoid AoE attacks and making a mistake, and Hondo calls Boba nearly killing the Range Trooper. However he stomps, the Commander heals and I lose Jango leaving just Hondo by himself. with 30 stacks of Ransom. Hondo take a ton of hits and his Ransom, Health and Protection go up, but eventually the enemies overwhelm him and I am done with nothing to show of this battle yet again.
My Roster of Characters:
- Total Power – 186k
- Rey – Relic 9
- Hondo Ohnaka – Relic 7
- Chewbacca – Relic 7
- Han Solo – Relic 8
- Rey (Jedi Training) – Relic 7
Take 3 – Phase 2 Combat Mission Battle Notes:
01.25.23 – I saved Rey from Light Side Combat Missions and this seems like a good place to try her out. Unfortunately I sent Ben Solo to Operations, so no use of my Relic 6 Ben Solo here. I debated the Han/Chewie and RJT combo as well as Beskar Mando with IG-11 and Kuiil, but decided on this in the end.
I stun Ranger Trooper to start but it does little to help. After getting past the Strormtrooper’s taunt I get a few hits in, but a key is keeping Chewie’s AoE dispel for after the Range Trooper’s stomp. Rey protects the team and I use my next few attacks on Range, killing him just after Rey hits with her AoE move. I land Tenacity Down and then a Stun on the Recon Stormtrooper and I work him down, going into the Ultimate with Rey whenever I can to protect the team. I continue to land Tenacity Down with Hondo and have Chewie and Han Stun which avoids more enemy attacks as the Stormtrooper is the last enemy standing and I finish him off with all enemies in good shape.
The second wave of enemies has Tarkin in the lead and I use Rey’s Ultimate immediately. Just after she hits the enemies with her AoE Tarkin one-shots a healthy Hondo… wow. I work around a taunt and Han hits Range Trooper who retaliates and kills Han, with plenty of Bonus Protection from Rey, with two shots… Chewie finally uses his AoE dispel only to have Range Trooper stomp his next turn, then Rey Whirlwinds the Imperial Officer and it does not kill him. She goes into Ultimate the next turn and that finishes him off but I lose Chewie. Now just Rey and RJT remain and a Rey WW is not even strong enough to remove Tarkin’s protection. I lose RJT and it is Rey all alone as she is overwhelmed and killed by the enemies.
My Roster of Characters:
- Total Power – 167k
- Bossk – Relic 9
- Hondo Ohnaka – Relic 7
- Boba Fett – Relic 8
- Greef Karga – Relic 6
- Fennec Shand – Relic 7
Take 4 – Phase 2 Combat Mission Battle Notes:
09.20.23 – Months later I come back to chronicle my efforts after having mild success with a team of Bounty Hunters on this mission. Last month I made it to the second wave of enemies with this team so I tried again today and found it is not just luck, but actually a lot of money used on Relics and some strategy.
As always with a Bossk-led Bounty Hunter team, you want him to taunt and you want to get to your Payout as soon as possible. In this battle, be careful of the Retribution counter attacks from the enemies and save you ability to dispel taunt for the right times. Today I waited for the Stormtrooper to taunt, dispelled with Boba Fett, then used the Bossk’s special to mass-attack the weakest enemy and get to Payout. Once at payout I avoided both Fennec and Boba Fett’s AoE attacks until after the enemies no longer had Retribution, then used the Armor Shred from Fennec to weaken the Range Trooper, killing him, then the Recon Stormtrooper next. I use Hondo’s Captive on the Imperial officer and from here just keep an eye on debuffs for Green to cleanse and keep Bossk taunting as much as possible.
The second wave is not designed for where SWGoH is today, so there is no strategy. A single AoE from Tarkin kills a full Health and Protection Fennec, so why bother at that point when the battle cannot be won with these characters at these levels.