One of the newest additions to Star Wars Galaxy of Heroes is Doctor Aphra, a comic book character who encountered many of our favorites in Star Wars in the years between Episode III and Episode IV on the canon timeline. Opened through the Rogue Archaeologist Legacy Event, Doctor Aphra is designed to be a significant Grand Arena player in 3v3 and 5v5 GAC. Below is a walkthrough/journal of my experience to unlock Doctor Aphra in SWGoH. Note that after unlocking her, our best mods for Doctor Aphra will be live on the site for reference.
Tier I
Hondo Ohnaka is the lone requirement for Tier I as I check in at Relic 6 & 30,645 power for my first attempt as I have not yet removed JMK’s mods from my failed Combat Mission in the Phase 2 of the RotE Territory Battle. Facing a Gam Guard, Mob Enforcer and Greedo, there has to be a specific strategy to stopping these enemies, but it take a couple of tries to figure it out.
Once I study things over due to my lack of familiarity with how Hondo works, it turns out the key is the stacks of Ransom, so I start with the second ability on “Boba Fett” (Greedo), then use basics on “Jabba” (GG) and build them up from there. The battle still is not foolproof after 15+ stacks of Ransom, but once you get to this point it is key to having a shot at winning. As the stacks of Ransom grow, your chances to win improve as well, but using the abilities strategically is more important as well. Utilizing the Ability Block and Turn Meter reduction helps tremendously as I probably fought this battle 5-7 times in total before figuring out the entire puzzle.
Tier II
For Tier II we use BT-1 and 0-0-0 and face off with CLS, R2-D2 and C-3PO. I start off with Triple Zero placing Torture on CLS and then BT follows with basics until CLS is dead and makes this battle look like a piece of cake, but it is not. R2-D2 then comes out with massive offense, so I try again, this time using special abilities from BT to kill CLS and weaken both R2 and C-3PO. This proves to work as BT barely scrapes by and kills R2 for 100 shards of Doctor Aphra as I move on.
Tier III
Putting my Relic 6, 28k power Sana Starros to work in Tier III. I start by putting Tenacity Down on the three enemies, BT-1, 0-0-0 and Krrsantan, then I use the middle ability. The trick here is getting around the taunt of Krrsantan to kill BT-1, the real disruptor of the battle. Landing Stagger seems to be very helpful, so I go back and place my best Potency-focused Offense plus mod on Sana and start finding that this helps me get closer to a victory. While trying to work around Krrsantan was what I started with, I decide to go right after the big guy instead and come one hit away from a win with 0-0-0 getting the better of me in another attempt. I try again and after an early Stagger to keep Big K from adding Defense Up it allows me to finish him off quicker and kills the droids for a close win.
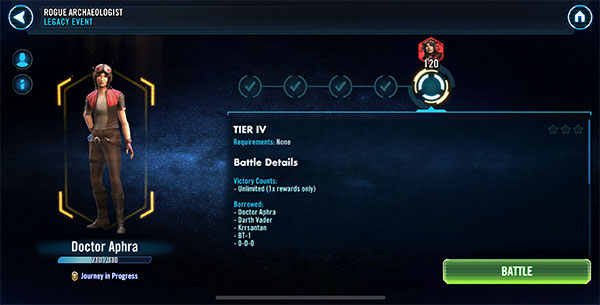
Tier IV
Fighting with five event units, I have Doctor Aphra with Darth Vader, Krrsantan, 0-0-0 and BT-1 together for this battle. Before the fight, Darth Vader appears to have finished running a sprint and he seems to be out of breath as he tells us what to do. Luckily, remembering the order is not that hard since a blue Marked appears above the enemy to kill next. Just do as told and kill them in this order – R2-D2, Leia, C-3PO, CLS, Chewie and Han Solo – and you should be fine as long as you do not mistakenly kill two in one turn.