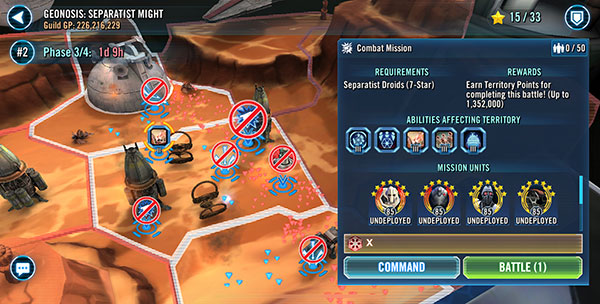
The Geonosian Territory Battles were launched in June 2019 starting with with the Dark Side battles, officially named Geonosis: Separatist Might.
The Geonosis: Separatist Might Territory Battle features four Phases which, at least at the start, last 36 hours each. Each of the four Phases of the event has a Special Mission rewarding Mk II Guild Event Tokens in Phases 1, 2 and 4 and Wat Tambor shards in Phase 3.
The following is a Walkthrough of my experiences in Phase 1 that may be updated over time. Phase 1’s Special Mission that requires 4 specific Separatist characters offers a reward of 15 Mk II Guild Event Tokens which are very valuable in SWGoH.
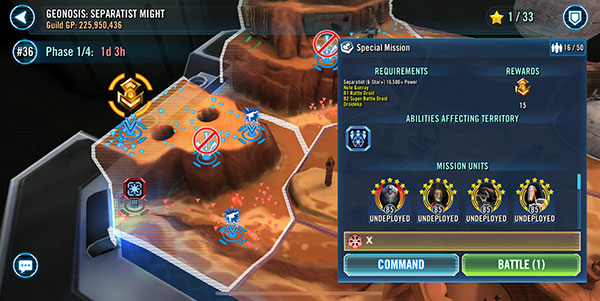
Phase 1 Special Mission Requirements:
- Minimum 6-star characters, 16,500+ Power
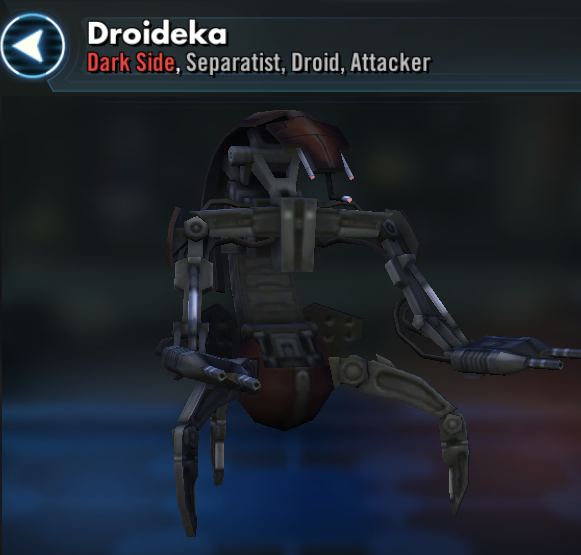
- Nute Gunray, B1 Battle Droid, B2 Super Battle Droid, Droideka
My Roster of Separatists:
- Nute Gunray – 21,307 power – 7-stars – Gear 12 +3 – 1 6-dot mod, 5 gold, 5-dot mods (Speed & Defense sets) – all abilities maxed, 266 speed
- B1 Battle Droid – 20,454 power – 7-stars – Gear 12 +3 – 5 gold & 1 purple, 5-dot mods (Speed set +2 random with high Speed secondaries) – all abilities maxed, 250 speed
- B2 Super Battle Droid – 21,153 power – 7-stars – Gear 13 – 1 6-dot mod, 5 gold, 5-dot mods (Health, Potency & Tenacity sets) – all abilities maxed, 148 speed
- Droideka – 20,454 power – Gear 12 +3 – 7-stars – 5 gold & 1 purple, 5-dot mods (Offense & Health sets) – all abilities maxed, 109 speed
- General Grievous – 24,358 power – 7-stars – Gear 13 – 6 6-dot mods (3 Health sets) – all abilities maxed, 218 speed
- IG-100 MagnaGuard – 20,898 power – 7 stars – Gear 12 + 5 – 6 gold, 5-dot mods (3 Health sets) – all abilities maxed, 167 speed
Phase 1 Special Mission Battle Notes:
08.13.19 – The debate in my Guild going into this battle is to use General Grievous or IG-100 MagnaGuard in the 5th slot. With a Gear 13 GG it is tough NOT to use him but many are saying Magna is better suited for the battles… I am going to test things out with the MagnaGuard and report my experience below.
4 battles are in this Special Mission and 6 enemies are in the first battle. There is no Clone Trooper Medic (CTM) in this one, so I will not go right after their offensive characters – the Clone Sharpshooters and Sergeants. I put Extortion on the Clone Commander because he feels more important with Commander in his name, as I honestly forget what all he can do (so many clones to learn about). The Commander is the first to die thanks to Nute’s calling of all Separatists to attack him and I quickly remove a Sharpshooter as well. The battle is an easy win and I actually have 111 stacks of Droid Battalion on B1 when I move on.
The second battle has 5 enemies – 3 Clones and 2 Jedi. With both a CTM and a Jedi Vanguard (JV) on the board I am looking to take these guys out first, but the two Clone Troopers will annoy for sure with Mace Windu doing the attacking. After a couple of attacks they triple taunt but Nute, Magna and B2 dispel before Nute adds more Extortion to the enemies. I remove both the CTM and JV and focus on Mace Windu, but he and the Clone Troopers are easy to pick off at this point.
The third battle appears to be in a Droid Factory and I do not believe I have made it this far previously. I have 5 enemies to defeat with a CTM and Barriss Offee, plus three Entrenched enemies – Clone Sharpshooter, Sergeant and ARC Trooper wit hthe ARC Trooper a United Front Elite enemy. Barriss is quickly Entrenched and my MagnaGuard is taking some hits but I use B1’s special effectively to regain Protection on Magna and take out the CTM. I focus my attacks on Barriss and now have Extortion on 2 Clones, but this Barriss obviously has a Zeta because she is healing on almost every hit. Finally a Droideka special removes her from my screen and I decide to take out the ARC since he has Extortion still. At this point the other two are in yellow health and easy to kill, so I advance with all in full health and 80%+ protection and B1 with 192 stacks of Droid Battalion.
The fourth and final battle sees me face 6 enemies, all Clones, with just one Elite. There are not CTMs so I go after the Sharpshooter first but CT-411 “Ponds” shoots a rocket and wakes me up a bit. I place Extortion on him which spreads, but my Magna is taking some hits with 2 stacks of Armor Shred on him. I take out the Sharpshooter with another big special attack from Droideka then have Nute focus all attacks on Ponds with his second special. This proves quite underwhelming as Ponds appears to have a Zeta Barriss Offee type of healing going on, so I change focus to the other Sharpshooter. I continue to spread Extortion and hit the Sharpshooter and the AoE attacks take out both the Sharpshooter and Ponds at the same time, much to my surprise. At this point the Clone Commander is the next weakest so he gets removed from the screen a few attacks later leaving just the Clone Trooper and Cody. They put up a tough fight, but in the end my team is too strong.
Phase 1 Special Mission Battle Notes (Take 2):
With the notes above I have decided to expand upon this content as my roster grows stronger. Here are the changes to my roster since the last time:
- Nute Gunray – no changes
- B1 – now Gear 13, 21,153 power, 1 6-dot & 5 gold, 5-dot mods, 278 speed
- B2 -no changes
- Droideka – no changes
- Count Dooku – 21,472 power – 7 stars – Gear 12 + 4 – 6 gold, 5-dot mods (Speed & Potency sets) – all abilities maxed, 283 speed
08.27.19 – Since I used the IG-100 MagnaGuard in the 5th slot last time I am using Count Dooku this time. If I end up 3 of 4 battles won my guild will probably not notice as we will easily score a perfect 6-stars in Phase 1, so I will take the gamble for the sake of education. That and I am really liking Dooku more at these high gear levels, especially for his Separatist Motives, Affiliation and Loyalty buffs.
The first battle ends with my B1 now at 119 stacks of Droid Battalion and Dooku granting one stack of Separatist Affiliation. Despite trying to setup Dooku for more kills in these battles, the hits I take are offset by B1’s special where I can select an ally to regain protection, so after Battle 2 is complete I am at full strength with 134 stacks of Droid Battalion and now 2 stacks of Separatist Affiliation.
The third battle featured Shaak Ti as the leader which presents some challenges, especially when I try to get too clever and setup Dooku for kills. I take some damage, but nothing I cannot withstand and recover from, and use Nute Gunray’s Extortion to my advantage. Killing Shaak Ti by herself proves to be a real challenge, but finally Dooku stuns her and the Separatist Might shines through. Heading into the 4th and final battle I have 174 stacks of Droid Battalion and 4 stacks of Separatist Affiliation, and go right after the Clone ARC Trooper since there is no medic. These harder battles really show the need for ridiculous Potency on your characters as I am unable to land debuffs with B2 or Dooku. B2 dispels multiple taunts and Nute Gunray places Extortion on the Entrenched, Elite Mace Windu, then I take out the ARC Trooper and Sharpshooter next. After these two are down the enemies start to fall apart from the weakening of the AoE attacks and strength of my team, but Windu does manage to use his Shatterpoint effectively and take out my B2. However once again my team is too strong and I score and easy 15 Mk II Guild Event Tokens for my Guild.
Phase 1 Special Mission Battle Notes (Take 3):
Now even stronger across my entire team, I am changing up the roster a bit to show more options. Here are the changes to my roster since the last time:
- Nute Gunray – now 21,517 power – Gear 12 +4, 272 speed
- B1 – now Gear 13, 21,153 power, 6 gold, 5-dot mods & 276 speed
- B2 – no changes
- Droideka – no changes
- Jango Fett – 21,370 power – 7 stars – Gear 12 + 1 – 5 gold & 1 blue, 5-dot mods (Speed & Health sets) – all abilities except Notorious Reputation maxed, 263 speed
09.10.19 – Now battling with Jango Fett as my 5th member, the first two battles go as planned as I get B1 up to 144 stacks of Droid Battalion. The 3rd battles sees the enemies get some hits in at the end, but nothing too bad, but the 4th battle takes me several attacks to even dent them. This time around I switch my offensive focus 3-4 times, which is dumb, but the one thing going for me in this battle is I have Nute’s Extortion spreading like a wildfire. This proves to be the difference as it continues to weaken my opponent, along with the AoE attacks, and in the end I am back to full health and protection on all allies and I get the easy win.
Phase 1 Special Mission – Additional Battle Notes:
Now with Relics in the game, these battles are even easier than before. Because my original goal was to help players see where they need to be to beat each of these Combat & Special Missions, I will not be continuing with the detailed walkthrough style and instead, when relevant, I will add additional notes on this Special Mission below. Note that Gaming-fans.com has started a complete series of SWGoH Relic Reviews for key characters in the game, so if you are looking for advice on which characters to upgrade first or just how good the Relic stat increases are, check these articles out!
- My lone Relic upgrades before my next battle of this Special Mission (09.24.19) were B1 Battle Droid (should have read the details more closely) and B2 Super Battle Droid